Tutorial: Build a Dapr Workflow application with Aspire
In this tutorial you'll:
- Create a Dapr Workflow application with Aspire from scratch
- Run the application locally with the Dapr workflow engine
- Use the Diagrid Dev Dashboard to monitor local Dapr workflow executions
- Run the application locally and use managed workflow engine provided by Catalyst
- Use Catalyst to monitor the workflows in the Catalyst web console
If you don't want to build an Aspire solution from scratch, you can clone the catalyst-samples repo, navigate to the workflow/csharp/CatalystAspire folder, and continue from step 6 or 7.
1. Prerequisites
- A container runtime such as Docker Desktop or Podman
- .NET 10
- Dapr CLI
- Aspire CLI
- Required from step 7:
2. Scaffold the project
2.1 Create the Aspire project
Let's start by creating the Aspire application. Use the Aspire CLI and create an Aspire starter app:
aspire new aspire-starter -n CatalystAspireApp -o CatalystAspireApp
Choose whether or not you want a test project added. Tests won't be used in this tutorial.
You should end up with a newly scaffolded Aspire starter solution in the CatalystAspireApp folder.
The solution contains:
- An AppHost project
- A ServiceDefaults project
- A Web project
- An ApiService project
2.2 Add dependencies
-
Next, add the following packages to enable the usage of Dapr Workflow:
cd CatalystAspireAppdotnet add CatalystAspireApp.AppHost/CatalystAspireApp.AppHost.csproj package CommunityToolkit.Aspire.Hosting.Daprdotnet add CatalystAspireApp.AppHost/CatalystAspireApp.AppHost.csproj package Aspire.Hosting.Valkeydotnet add CatalystAspireApp.ApiService/CatalystAspireApp.ApiService.csproj package Dapr.Workflow -
Create a
Resourcesfolder in theCatalystAspireApp.AppHostfolder.mkdir CatalystAspireApp.AppHost/Resources1 -
Add a Dapr state store component file called
statestore.yamlin the Resources folder, add the following content:apiVersion: dapr.io/v1alpha1kind: Componentmetadata:name: workflow-storespec:type: state.redisversion: v1metadata:- name: redisHostvalue: "localhost:16379"- name: redisPasswordvalue: "zxczxc123"- name: actorStateStorevalue: true -
Add another Dapr state store component file that will be used by the Diagrid Dev Dashboard, called
statestore-dashboard.yamlin the Resources folder, add the following content:apiVersion: dapr.io/v1alpha1kind: Componentmetadata:name: workflow-storescopes:- diagrid-dashboardspec:type: state.redisversion: v1metadata:- name: redisHostvalue: "host.docker.internal:16379"- name: redisPasswordvalue: "zxczxc123"- name: actorStateStorevalue: true -
Now update the
CatalystAspireApp.AppHost/CatalystAspireApp.AppHost.csprojfile to include the content of theResourcesfolder. This folder contains some Dapr state component files that are required for running stateful workflows and also to use the Diagrid Dev Dashboard.<ItemGroup><Content Include="Resources\**\*.*"><CopyToOutputDirectory>PreserveNewest</CopyToOutputDirectory><!-- Optional: show files in Solution Explorer under a virtual folder --><Link>Resources\%(RecursiveDir)%(Filename)%(Extension)</Link></Content></ItemGroup>
2.3 Configure the AppHost project
Continue with setting up the AppHost project to run our project with Dapr.
Using your favorite editor, open up the CatalystAspireApp.AppHost/AppHost.cs file and replace the entire content with the following:
using System.Reflection;
using CommunityToolkit.Aspire.Hosting.Dapr;
using Microsoft.AspNetCore.Components.Authorization;

var builder = DistributedApplication.CreateBuilder(args);

builder.AddDapr();

string executingPath = Path.GetDirectoryName(Assembly.GetExecutingAssembly().Location) ?? throw new("Where am I?");

// This is the state store Dapr will use for the workflow state.
var cachePassword = builder.AddParameter("cache-password", "zxczxc123", secret: true);
var cache = builder
    .AddValkey("cache", 16379, cachePassword)
    .WithContainerName("workflow-state")
    .WithDataVolume("workflow-state-data")
    ;

// The ApiService will contain the Dapr Workflow definitions and requires a Dapr sidecar.
var apiService = builder.AddProject<Projects.CatalystAspireApp_ApiService>("apiservice")
    .WithDaprSidecar(new DaprSidecarOptions
        {
            LogLevel = "debug",
            ResourcesPaths =
            [
                Path.Join(executingPath, "Resources"),
            ],
        }
    );

apiService.WaitFor(cache);

// Configure the Diagrid Dev Dashboard, you can access this via the Aspire Dashboard to inspect Dapr workflows.
builder
    .AddContainer("diagrid-dashboard", "ghcr.io/diagridio/diagrid-dashboard:latest")
    .WithContainerName("diagrid-dashboard")
    .WithBindMount(Path.Join(executingPath, "Resources"), "/app/components")
    .WithEnvironment("COMPONENT_FILE", "/app/components/statestore-dashboard.yaml")
    .WithEnvironment("APP_ID", "diagrid-dashboard")
    .WithHttpEndpoint(targetPort: 8080)
    .WithReference(cache)
    ;

// We're not using the web front-end project in this tutorial, but it can stay.
builder.AddProject<Projects.CatalystAspireApp_Web>("webfrontend")
    .WithExternalHttpEndpoints()
    .WithHttpHealthCheck("/health")
    .WithReference(apiService)
    .WaitFor(apiService);

builder.Build().Run();
3. Create the workflow
In the ApiService project, create a new class called FirstWorkflow with the following content:
using Dapr.Workflow;

namespace CatalystAspireApp.ApiService;

public class FirstWorkflow : Workflow<FirstWorkflow.Input, FirstWorkflow.Output>
{
    public record Input
    {
        public required int Left { get; init; }
        public required int Right { get; init; }
    }

    public record Output
    {
        public required int Value { get; init; }
    }

    public override async Task<Output> RunAsync(WorkflowContext context, Input input)
    {
        var firstActivityResult = await context.CallActivityAsync<FirstActivity.Output>(
            nameof(FirstActivity),
            new FirstActivity.Input
            {
                Left = input.Left,
                Right = input.Right,
            });

        await context.CreateTimer(TimeSpan.FromSeconds(3));

        var secondActivityResult = await context.CallActivityAsync<SecondActivity.Output>(
            nameof(SecondActivity),
            new SecondActivity.Input
            {
                Value = firstActivityResult.Sum,
            });

        return new()
        {
            Value = secondActivityResult.Value,
        };
    }
}
4. Create the activities
We'll create two sample activities to demonstrate how workflows can complete work.
First, create a class called FirstActivity with the following content:
using Dapr.Workflow;

namespace CatalystAspireApp.ApiService;

public class FirstActivity : WorkflowActivity<FirstActivity.Input, FirstActivity.Output>
{
    public record Input
    {
        public required int Left { get; init; }
        public required int Right { get; init; }
    }

    public record Output
    {
        public required int Sum { get; init; }
    }

    public override async Task<Output> RunAsync(WorkflowActivityContext context, Input input)
    {
        return new()
        {
            Sum = input.Left + input.Right,
        };
    }
}
Next create a second class called SecondActivity and use the following code:
using Dapr.Workflow;

namespace CatalystAspireApp.ApiService;

public class SecondActivity : WorkflowActivity<SecondActivity.Input, SecondActivity.Output>
{
    public record Input
    {
        public required int Value { get; init; }
    }

    public record Output
    {
        public required int Value { get; init; }
    }

    public override async Task<Output> RunAsync(WorkflowActivityContext context, Input input)
    {
        return new()
        {
            Value = input.Value * 1000,
        };
    }
}
5. Add workflow management operations
There needs to be a way to schedule new workflow executions and get the status of them. Two endpoints will be added to the CatalystAspireApp.ApiService/Program.cs to enable this.
-
Add the following
usings to theCatalystAspireApp.ApiService/Program.cs:using Microsoft.AspNetCore.Mvc;using CatalystAspireApp.ApiService;using Dapr.Workflow; -
Register the workflow and the two activities with the
AddDaprWorkflowextension method:builder.Services.AddDaprWorkflow(options =>{options.RegisterWorkflow<FirstWorkflow>();options.RegisterActivity<FirstActivity>();options.RegisterActivity<SecondActivity>();}); -
Add a
startPOST endpoint that will schedule a new Dapr workflow execution:app.MapPost("/start", async ([FromServices] DaprWorkflowClient workflowClient) =>{var instanceId = await workflowClient.ScheduleNewWorkflowAsync(nameof(FirstWorkflow),input: new FirstWorkflow.Input{Left = 5,Right = 10,});return Results.Ok(new { instanceId });}); -
Add a
statusGET endpoint to retrieve the workflow state:app.MapGet("/status/{instanceId}", async ([FromRoute] string instanceId,[FromServices] DaprWorkflowClient workflowClient) =>{var state = await workflowClient.GetWorkflowStateAsync(instanceId);if (state == null){return Results.NotFound();}var output = state.ReadOutputAs<FirstWorkflow.Output>();return Results.Ok(new {instanceId, state, output});}); -
Add the POST and GET requests to the
CatalystAspireApp.ApiService/CatalystAspireApp.ApiService.httpfile for later use:### Start a workflow# @name startRequestPOST {{ApiService_HostAddress}}/start### Get the workflow status@instanceId = {{startRequest.response.body.$.instanceId}}GET {{ApiService_HostAddress}}/status/{{instanceId}}Alternatively you can use these cURL statements:
curl --request POST --url http://<apiservice-host>:<port>/startcurl --request GET --url http://<apiservice-host>:<port>/status/<instanceID>
6. Run locally with Dapr
-
Start up the Aspire application in the root of the solution:
aspire run -
Once the application is up and running, use the POST
startendpoint inCatalystAspireApp.ApiService/CatalystAspireApp.ApiService.httpto start a workflow. -
Use the GET
statusendpoint inCatalystAspireApp.ApiService/CatalystAspireApp.ApiService.httpto verify the workflow state.
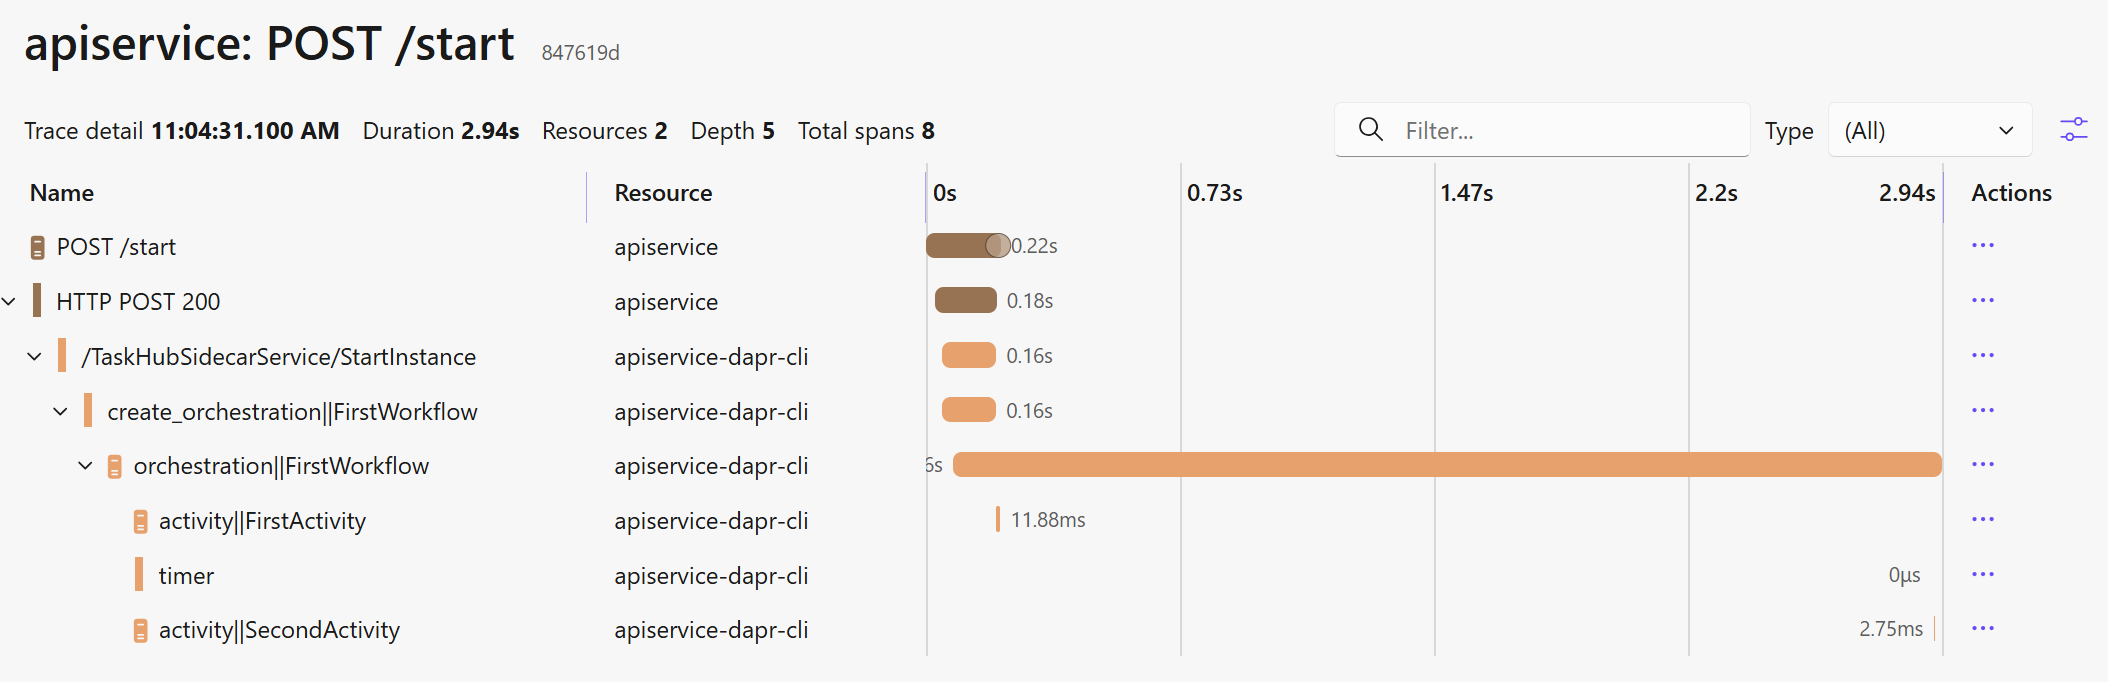
6.1 Aspire dashboard
To inspect the traces of the workflow execution open the Traces tab of the Aspire Dashboard and select the apiservice: POST/start trace:
6.2 Diagrid dev dashboard
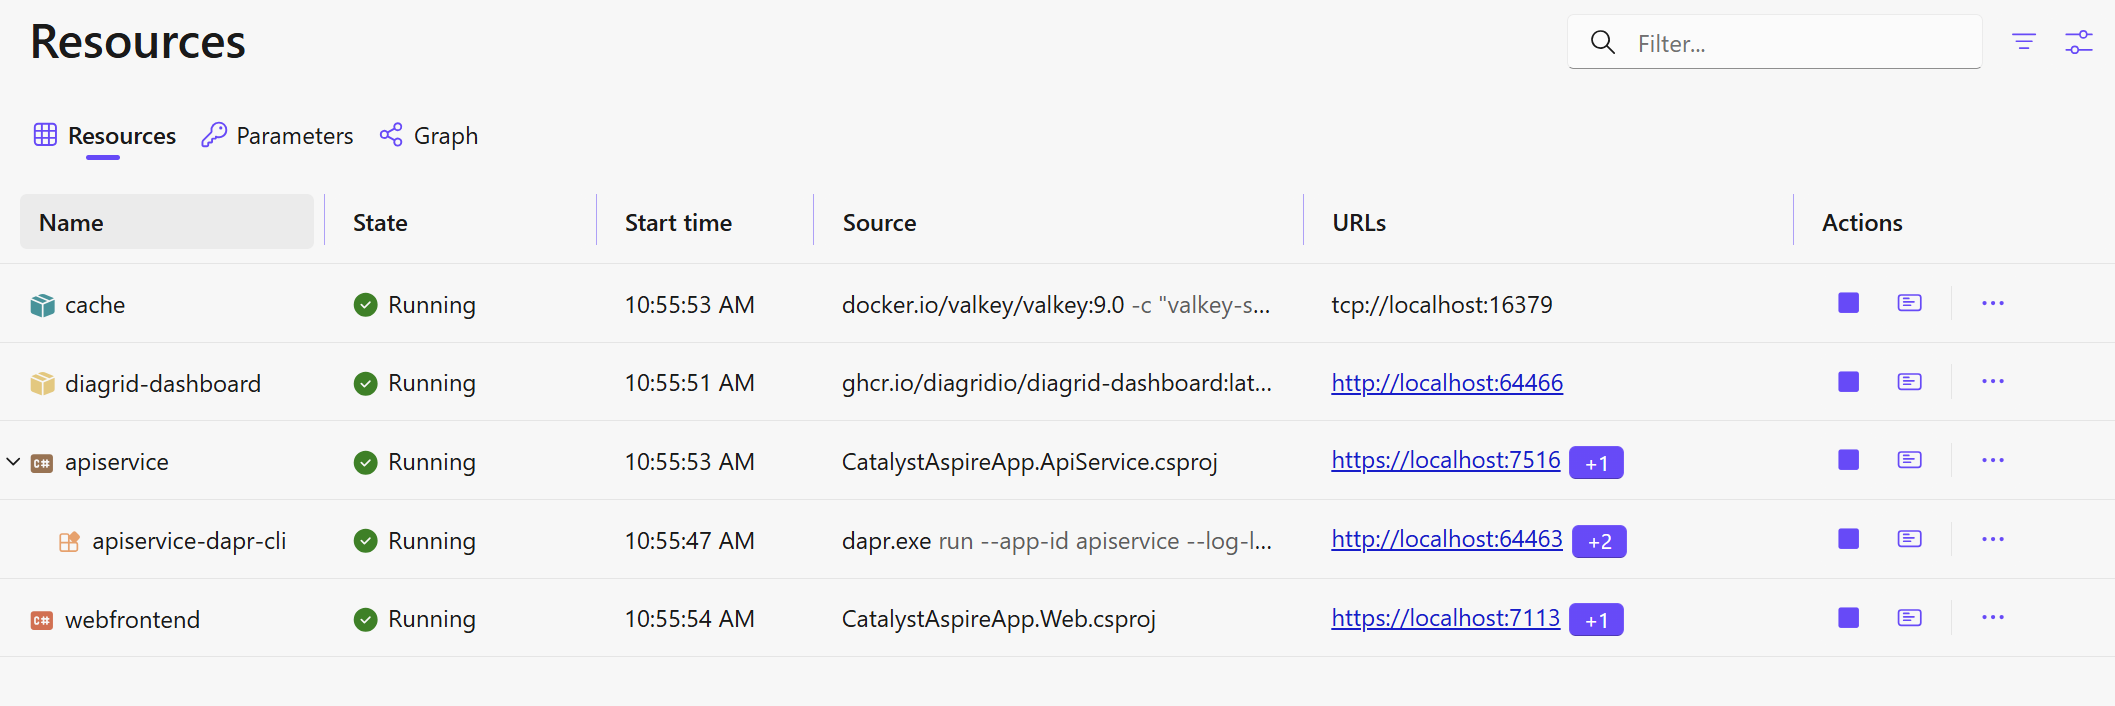
To inspect the workflow execution history open the Diagrid Dev Dashboard via the Aspire Resources tab. Select the URL of the diagrid-dashboard resource:
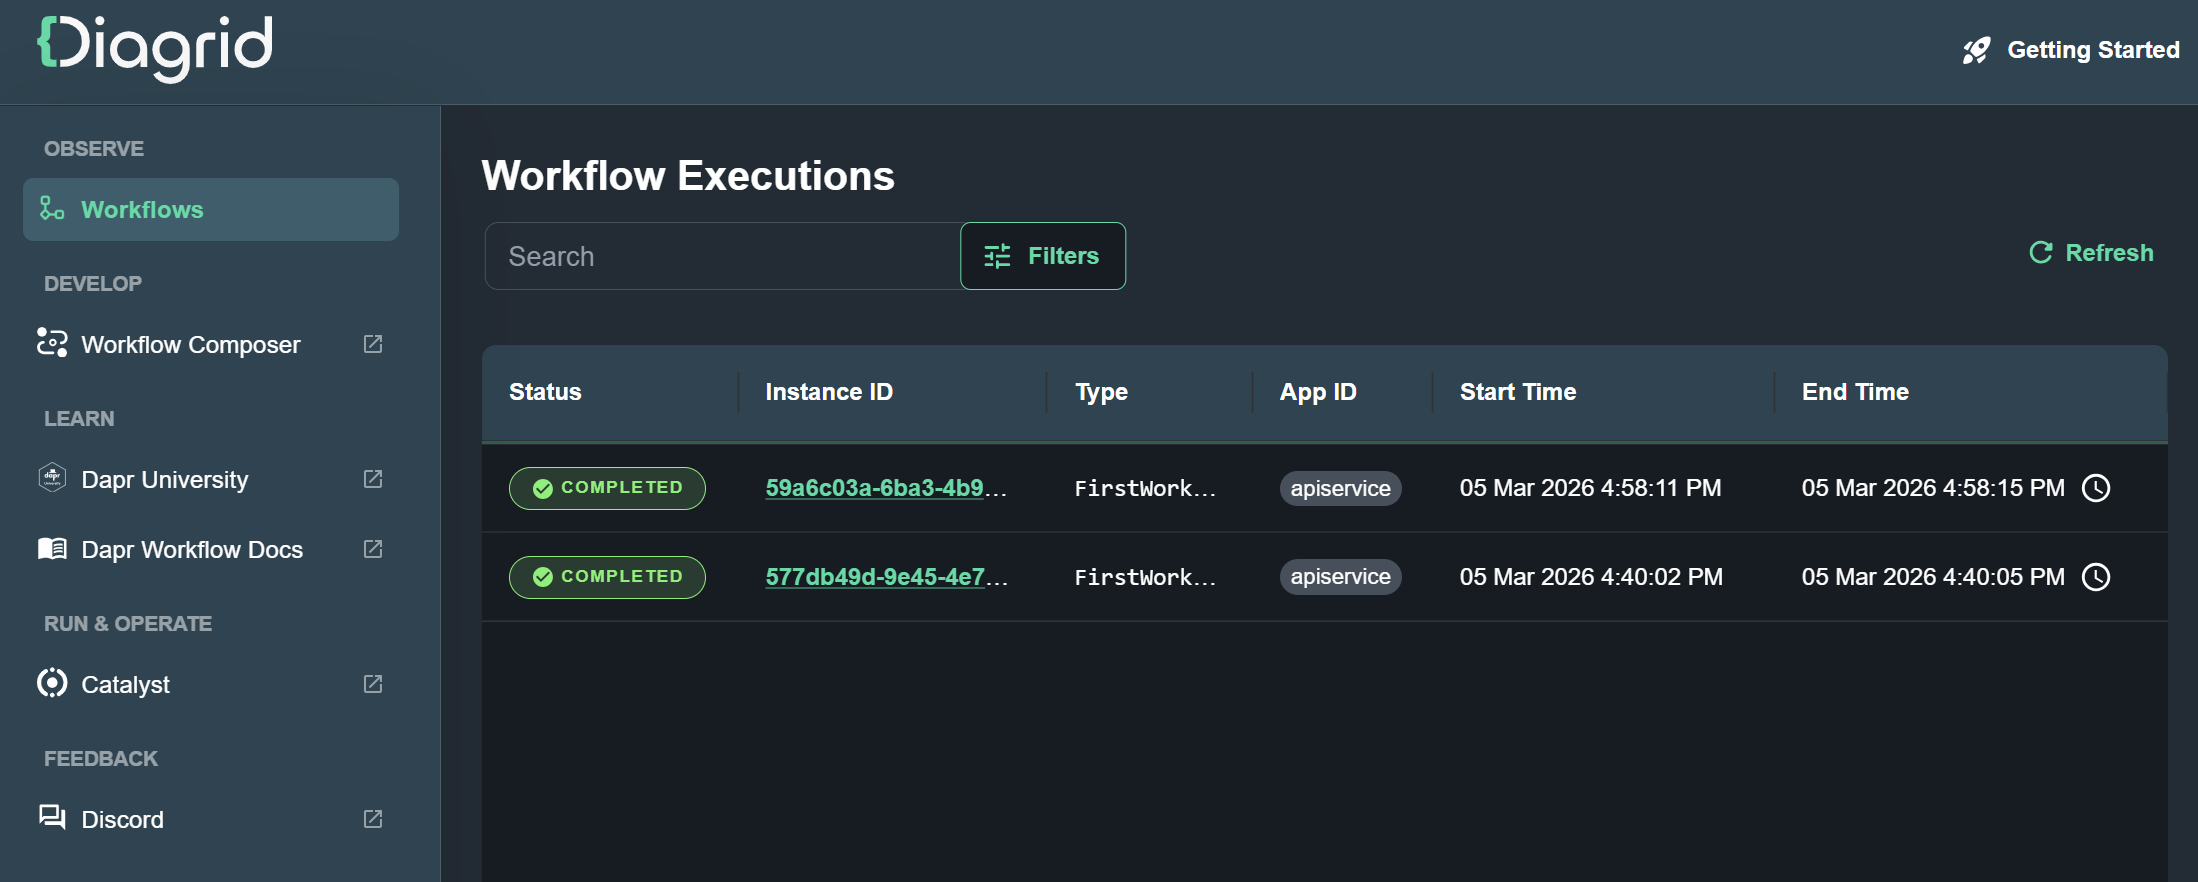
Once the Diagrid Dev Dashboard is opened, select the Workflows tab in the menu to see all workflow executions. Select the workflow instance ID to drill down and see the workflow inputs/outputs and execution history:
7. Switch to Catalyst
Once you're done with local development and want to get more insights on how your workflow is performing, you can switch the local Dapr workflow engine with the workflow engine managed by Catalyst.
-
Add the Diagrid Catalyst Aspire integration package to the AppHost project:
dotnet add CatalystAspireApp.AppHost/CatalystAspireApp.AppHost.csproj package Diagrid.Aspire.Hosting.Catalyst -
Replace the complete
CatalystAspireApp.AppHost/AppHost.cscontent with:using Diagrid.Aspire.Hosting.Catalyst;using Microsoft.AspNetCore.Components.Authorization;var builder = DistributedApplication.CreateBuilder(args);// This configures a new project in Catalyst with a managed state store for workflow state.var catalystProject = builder.AddCatalystProject("catalyst-aspire").WithCatalystKvStore();// The apiService will not use a Dapr sidecar anymore but will use the Catalyst.var apiService = builder.AddProject<Projects.CatalystAspireApp_ApiService>("apiservice").WithCatalyst(catalystProject);// We're not using the web front-end project in this tutorial, but it can stay.builder.AddProject<Projects.CatalystAspireApp_Web>("webfrontend").WithExternalHttpEndpoints().WithHttpHealthCheck("/health").WithReference(apiService).WaitFor(apiService);builder.Build().Run(); -
These dependencies can now be removed from the AppHost project since the state is now managed by Diagrid Catalyst.
dotnet remove ./CatalystAspireApp.AppHost package Aspire.Hosting.Valkeydotnet remove ./CatalystAspireApp.AppHost package CommunityToolkit.Aspire.Hosting.Dapr
8. Run with Diagrid Catalyst
-
Login to Diagrid Catalyst:
diagrid login -
Start the Aspire application from the root of the solution:
aspire run
8.1 Aspire dashboard
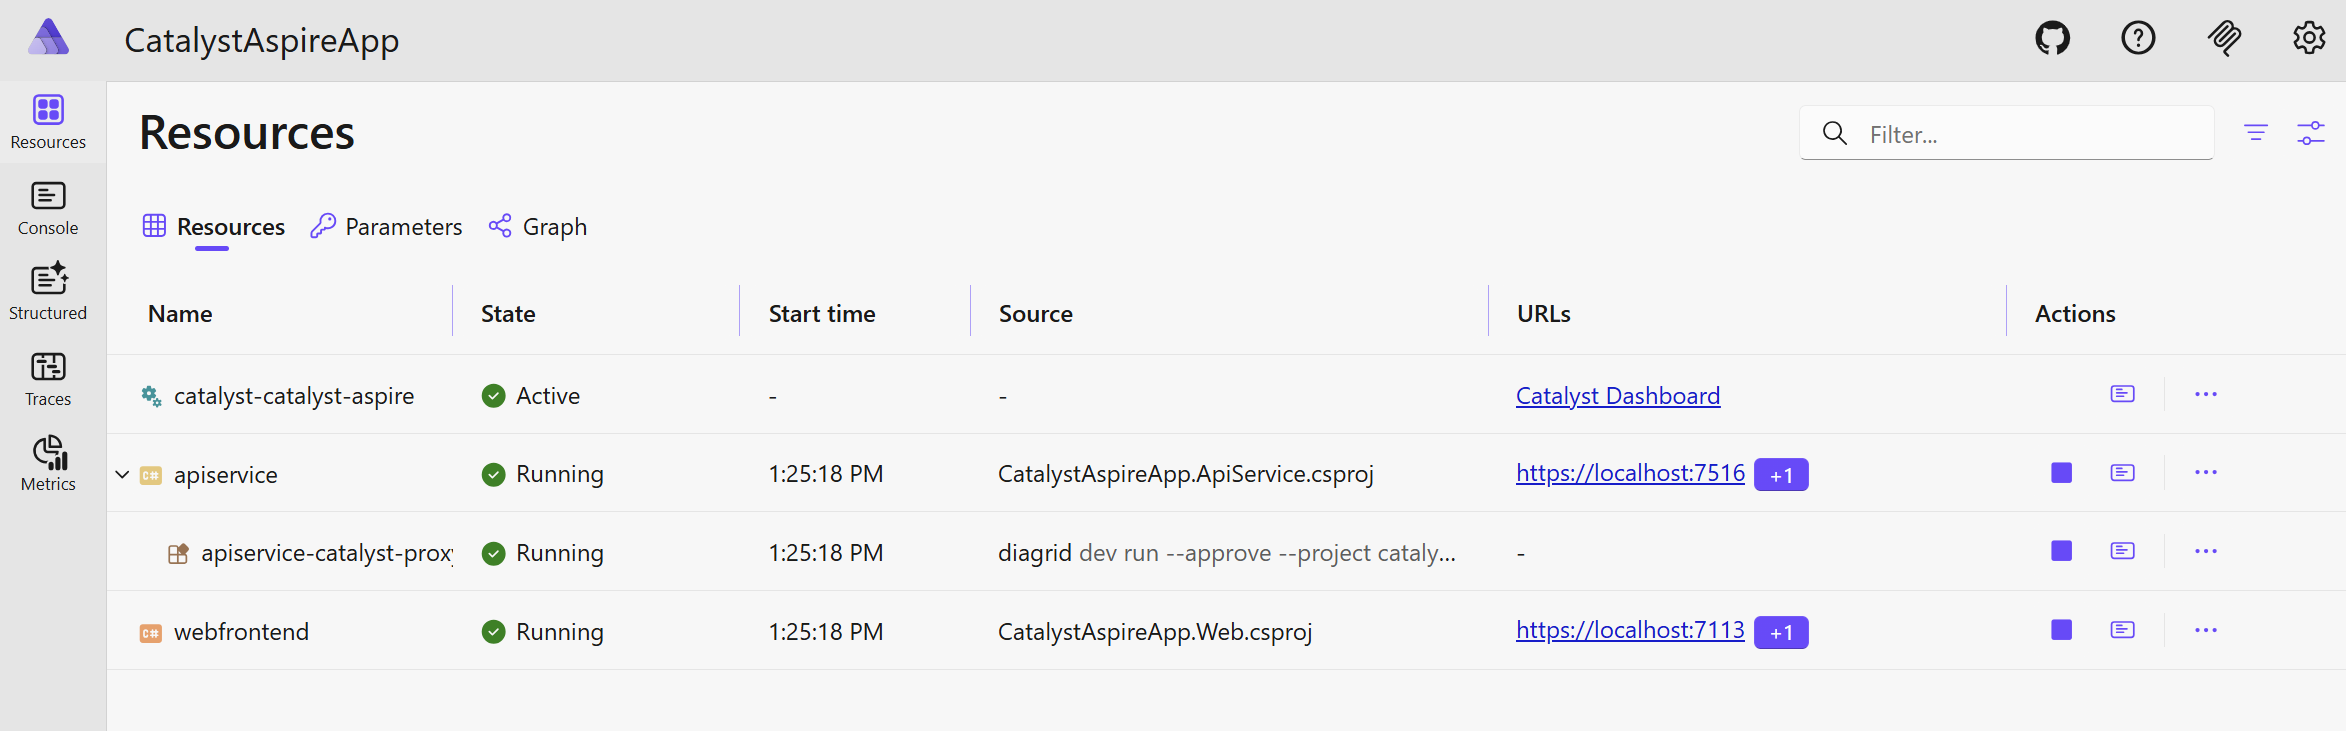
Once the application is running, use the Aspire Resources tab to navigate to the Catalyst Dashboard:
8.2 Catalyst dashboard
-
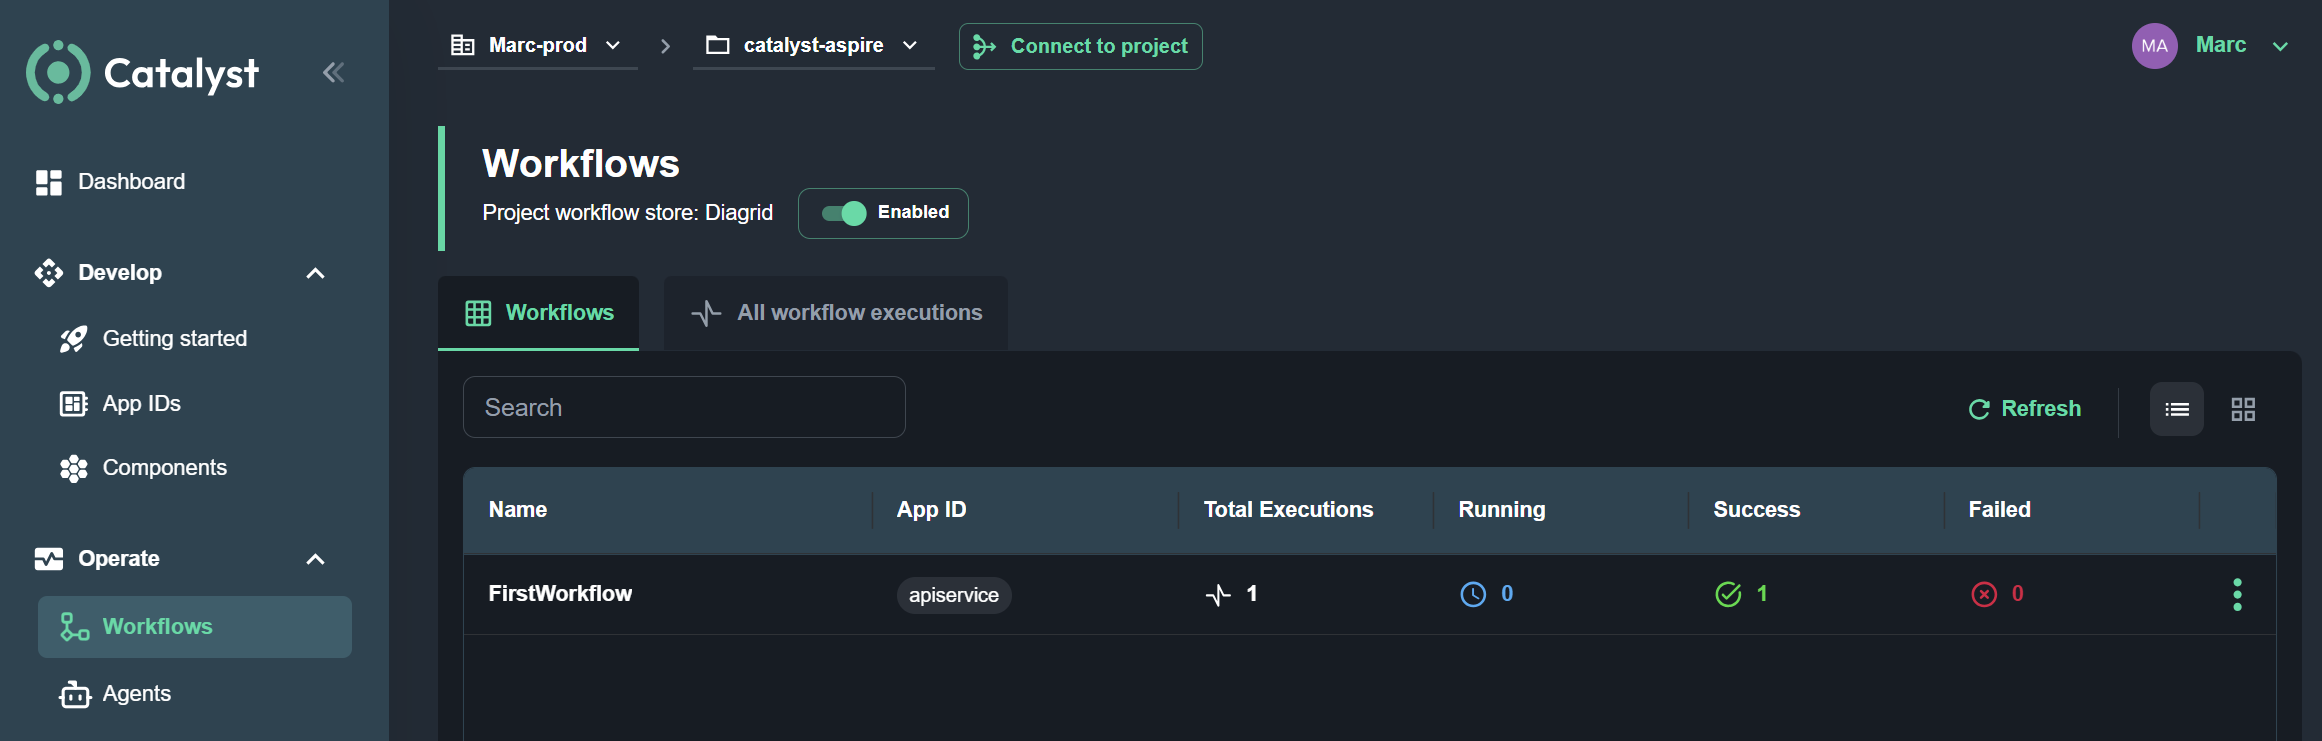
In Catalyst, use the Workflows tab to navigate to the workflow view:
-
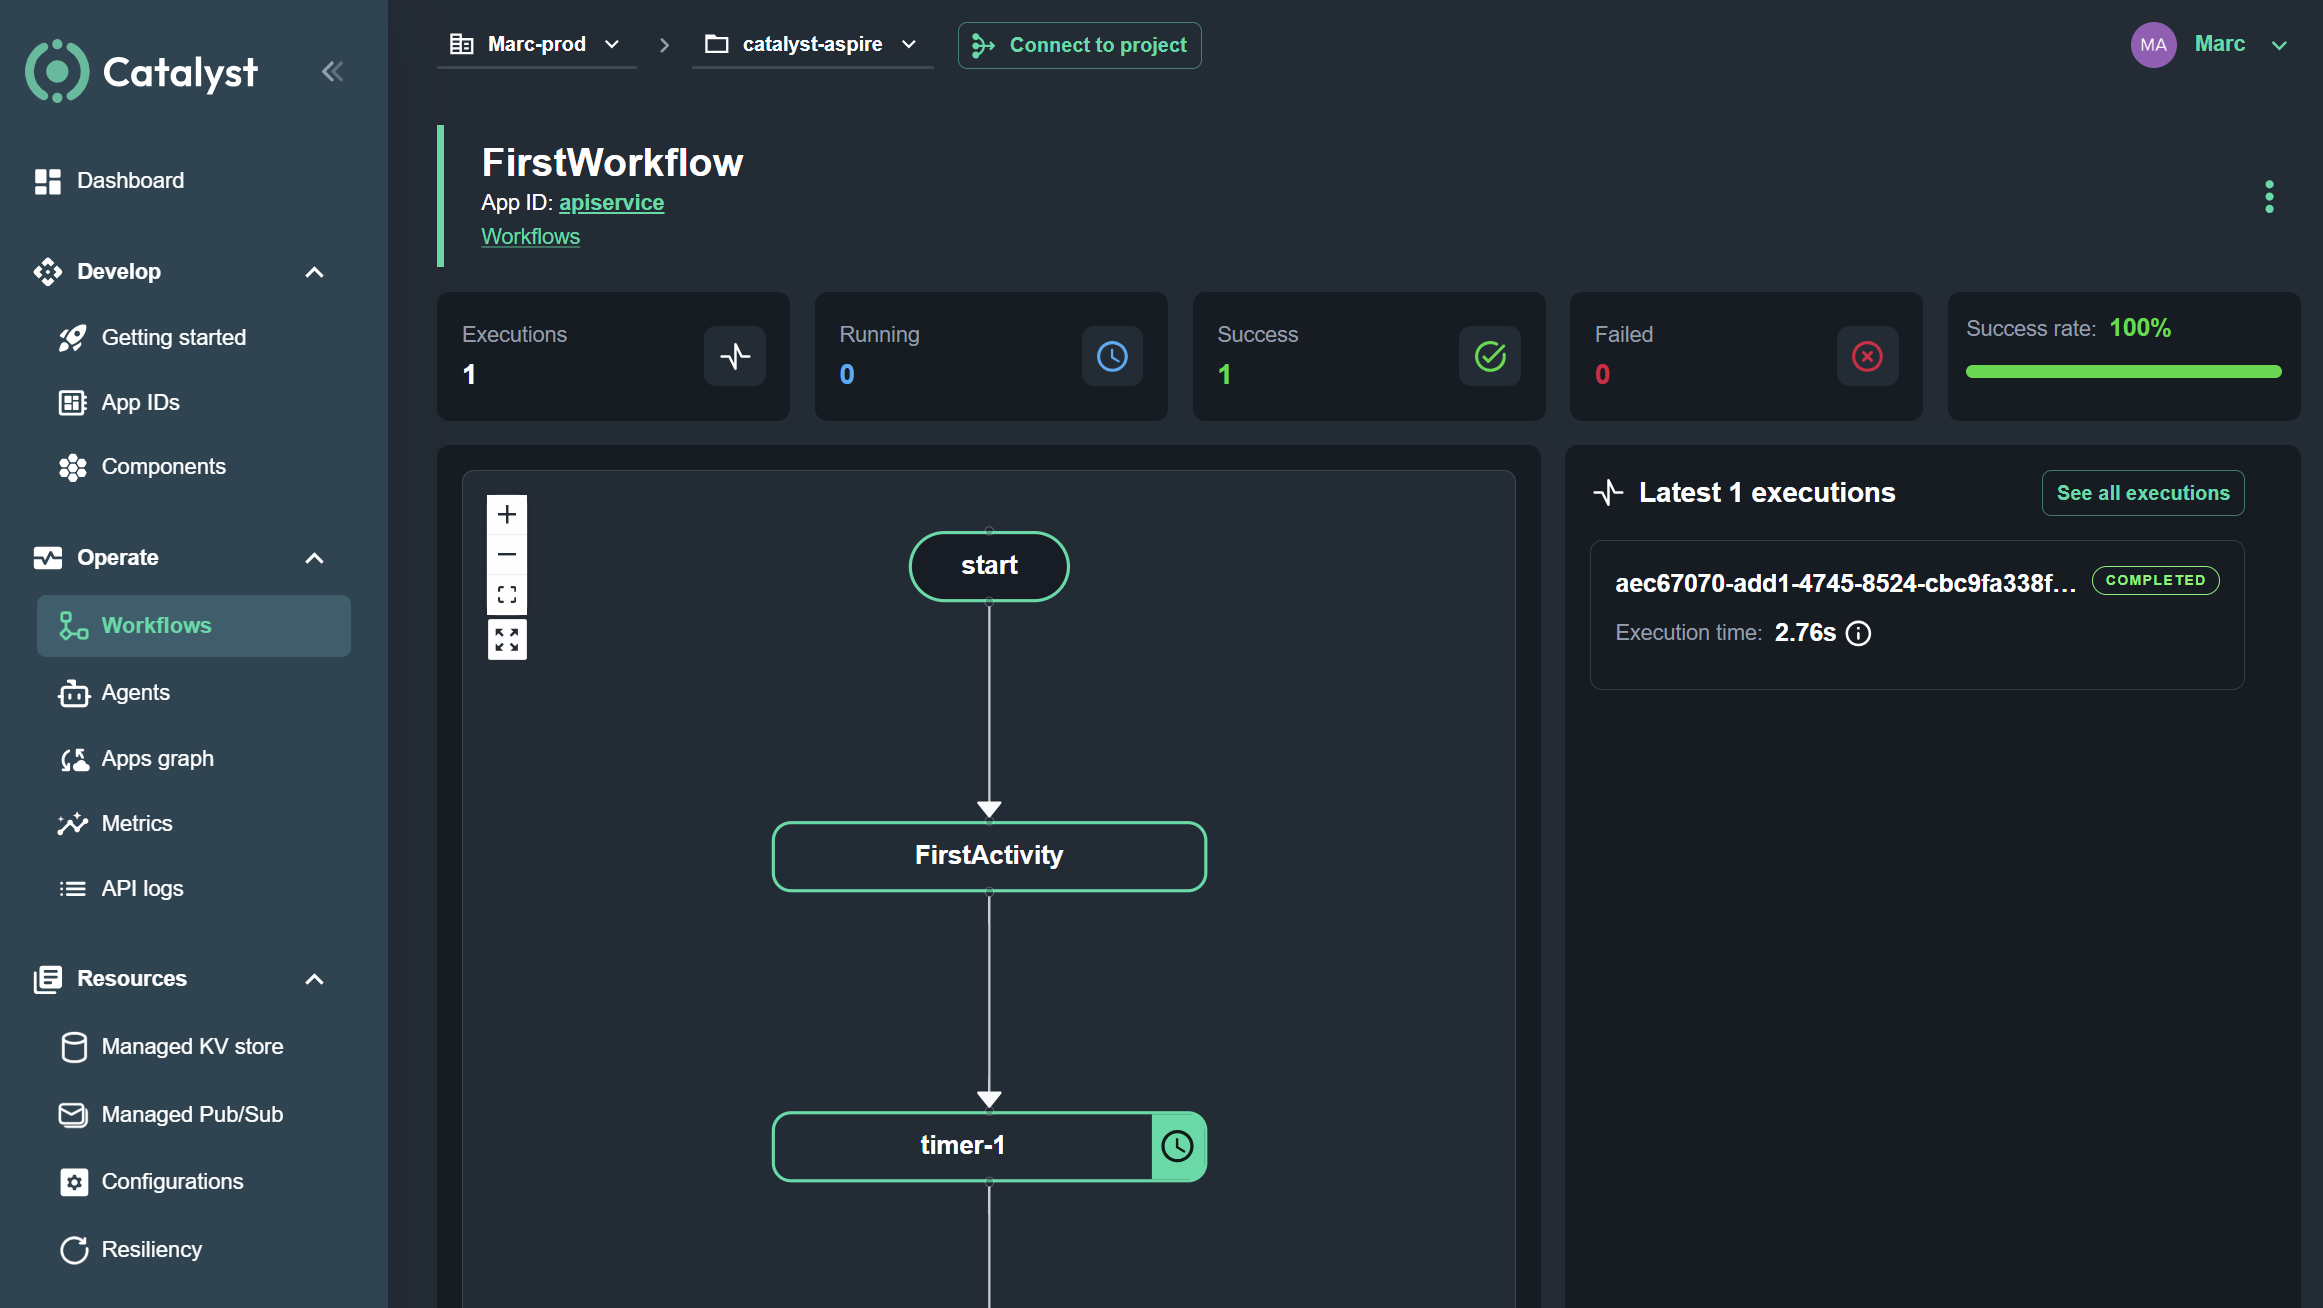
Click on the FirstWorkflow to drill down:
-
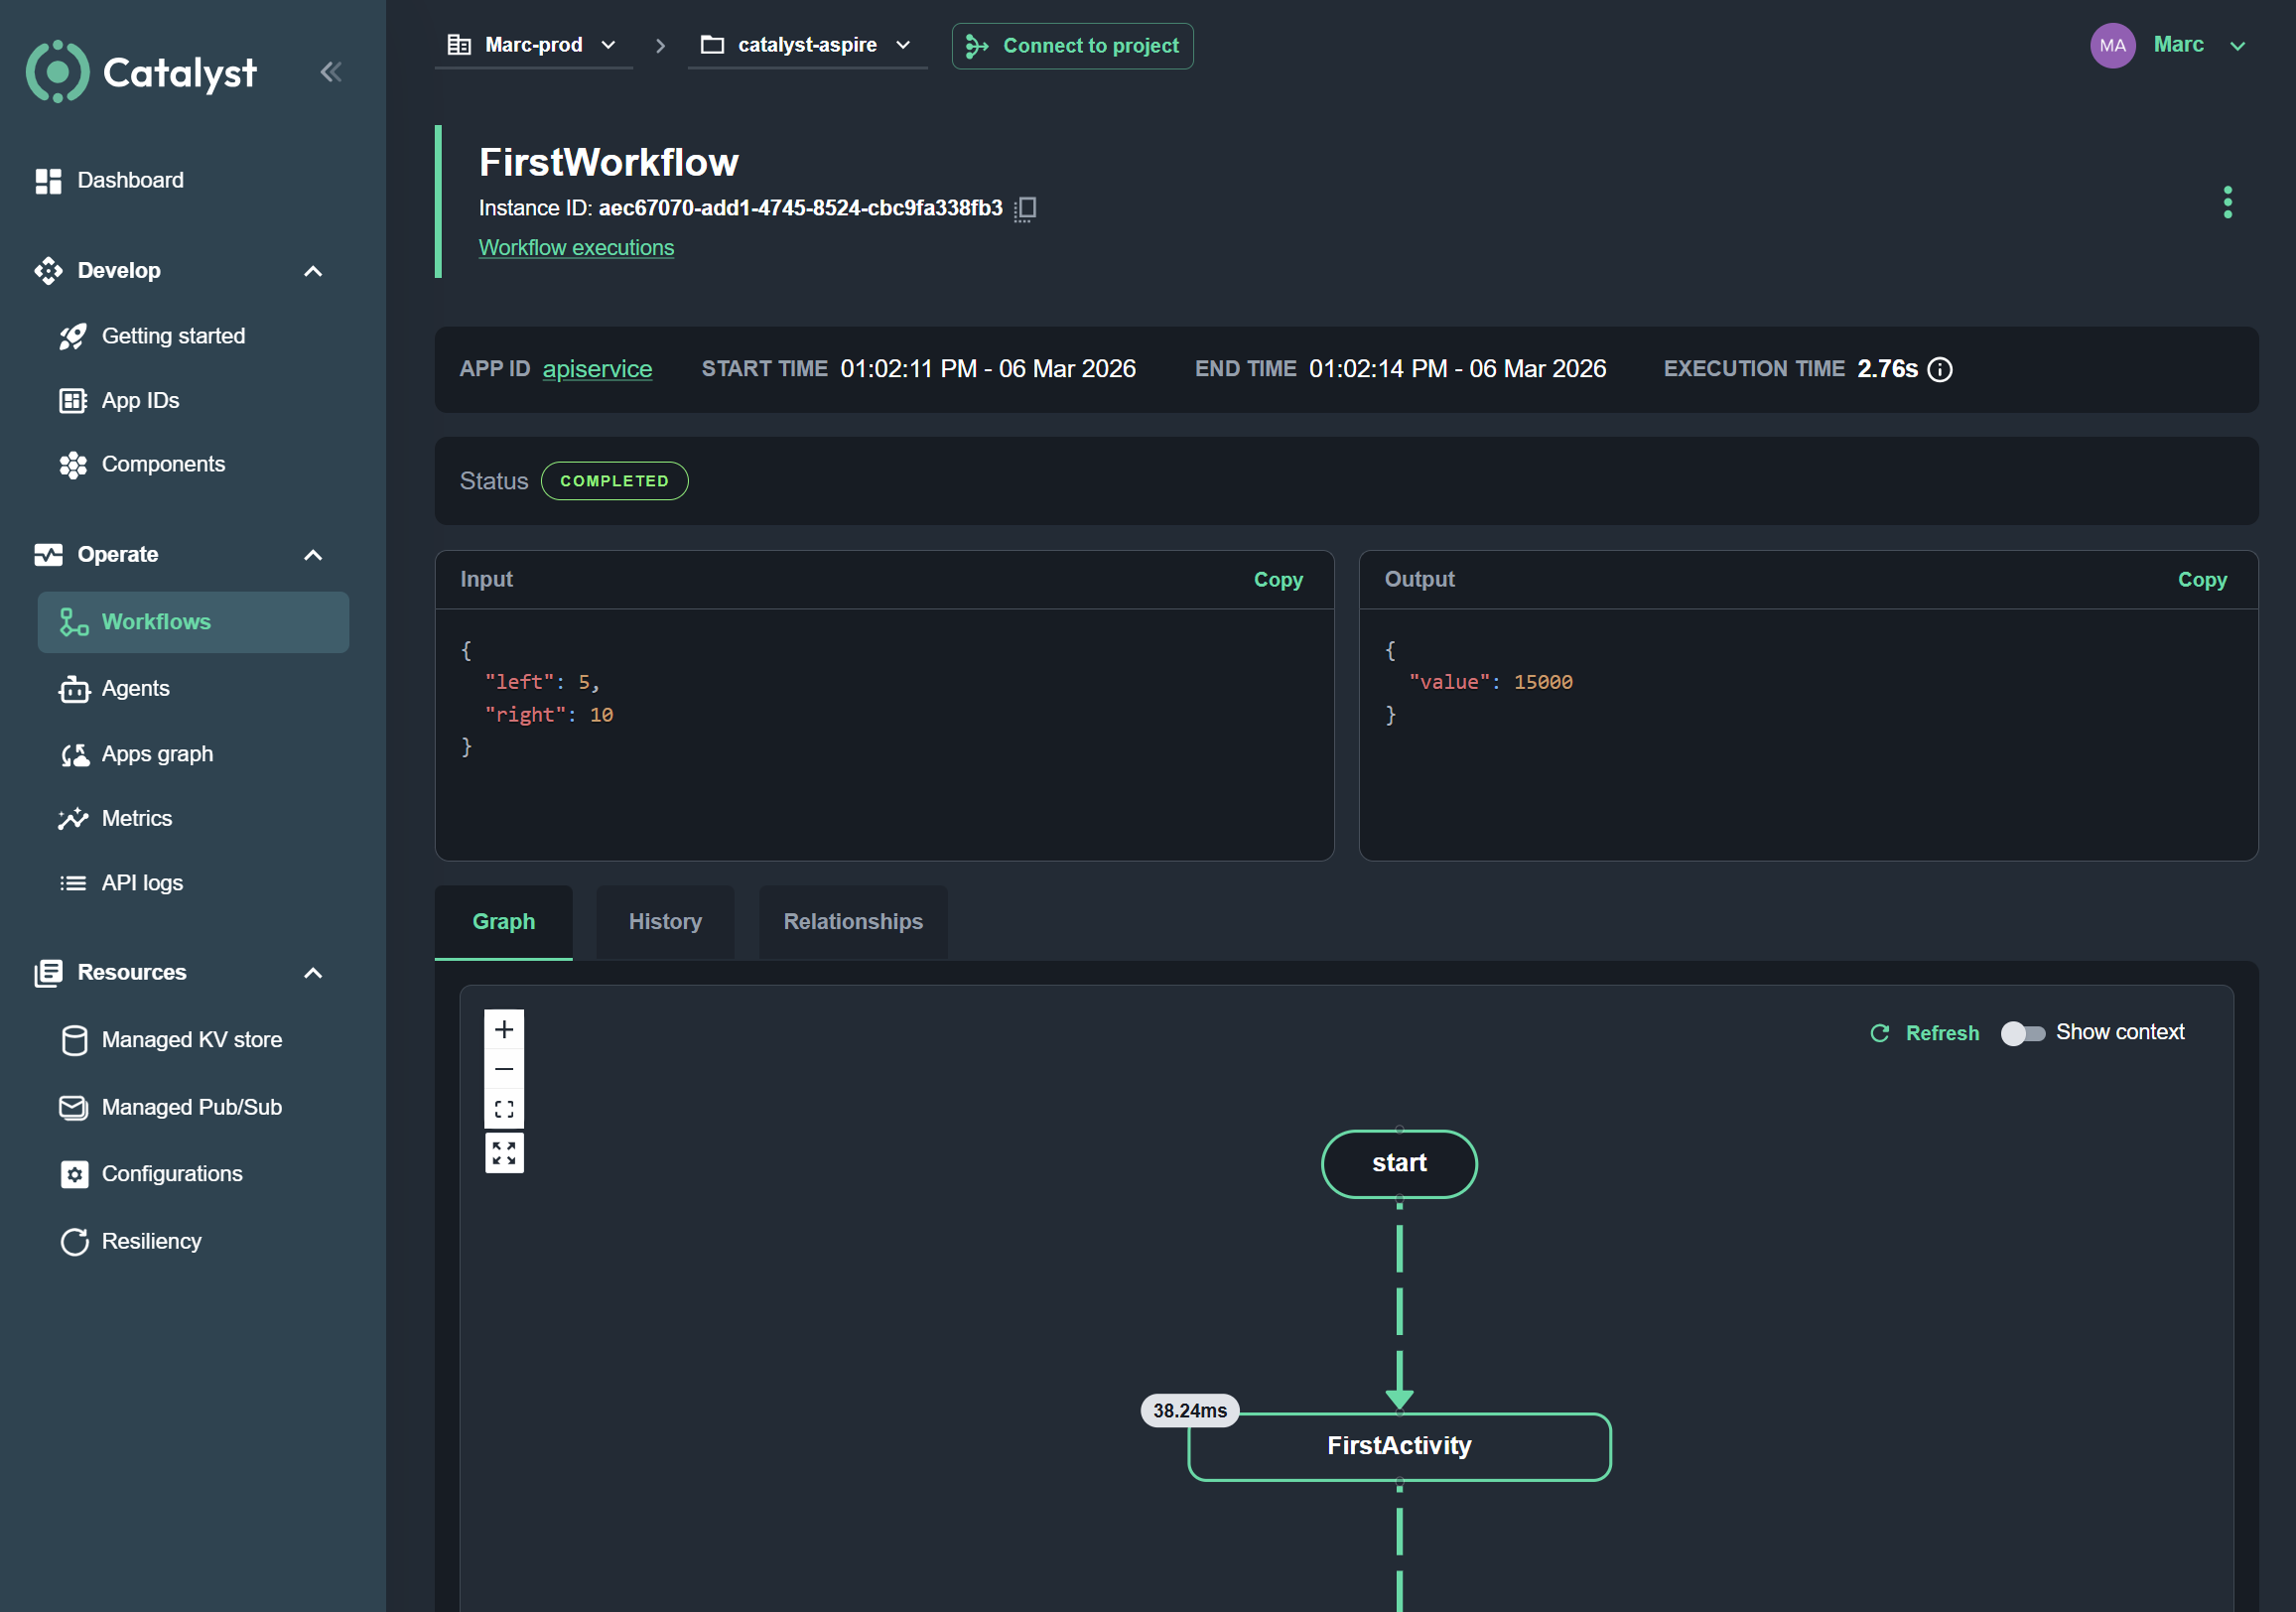
Click on a workflow execution to see the inputs/outputs, interactive graph and execution history:
8.3 Troubleshooting
If you're running into issues with the Diagrid Catalyst Aspire integration (e.g. unresponsive status in the Aspire dashboard) run the following command to stop the local dev tunnel for the project:
diagrid dev stop --project catalyst-aspire
Once the dev tunnel is stopped retry running the Aspire solution again.
Summary
In this tutorial you:
- Scaffolded an Aspire starter application and added Dapr Workflow support
- Created a workflow with two activities that perform sequential operations
- Added HTTP endpoints to start and monitor workflow executions
- Ran the application locally using the Dapr sidecar and Valkey for state storage
- Inspected workflow traces in the Aspire Dashboard and the Diagrid Dev Dashboard
- Switched from the local Dapr workflow engine to the managed Catalyst workflow engine
- Monitored workflow executions, inputs/outputs, and execution history in the Catalyst Dashboard
Next steps
- Explore the Dapr workflow patterns such as fan-out/fan-in, chaining, and sub-workflows.