Quickstart: Multi-Agent Workflow
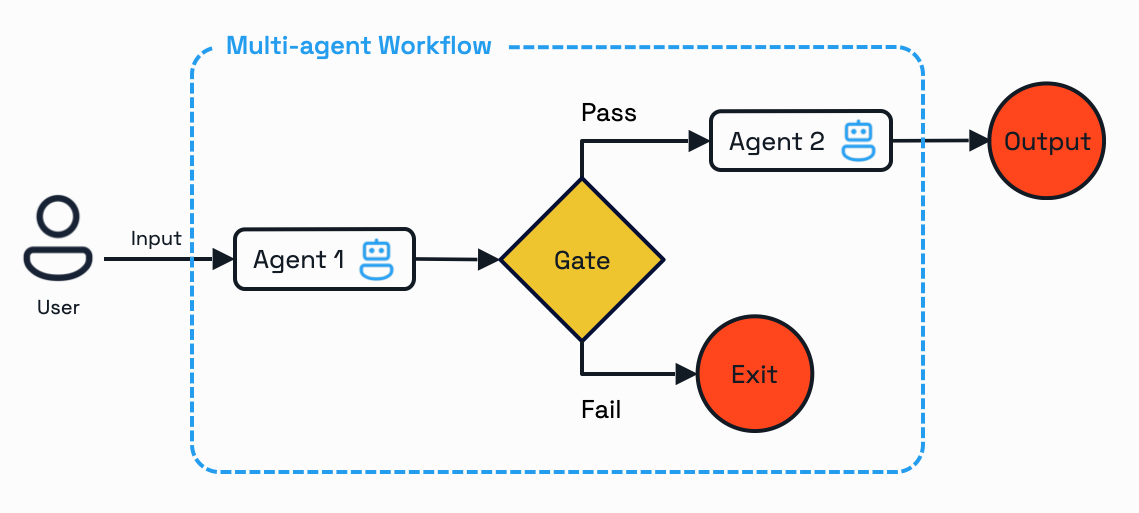
This quickstart showcases how to build a durable, multi-agent workflow using Dapr Agents and Workflows. The workflow acts as a customer support system that triages support tickets and provides troubleshooting resolutions through two cooperating AI agents. Start by developing locally with Dapr and the Diagrid Dashboard, then optionally onboard to Catalyst Online for managed workflow execution.
Part 1: Develop Locally with Dapr
Develop and test your multi-agent workflows locally using Dapr and the Diagrid Dashboard for workflow visualization and debugging.
Prerequisites
Before you proceed, ensure you have the following prerequisites installed:
Install Diagrid CLI
Download and install the Diagrid CLI:
- MacOS
- Linux
- Windows
curl -o- https://downloads.diagrid.io/cli/install.sh | bash
Move the diagrid binary into your path:
sudo mv ./diagrid /usr/local/bin
curl -o- https://downloads.diagrid.io/cli/install.sh | bash
Move the diagrid binary into your path:
sudo mv ./diagrid /usr/local/bin
Download the PowerShell installer:
iwr -Uri https://downloads.diagrid.io/cli/install.ps1 -OutFile install.ps1
Execute the PowerShell installer:
.\install.ps1
You may need to temporarily set the PowerShell execution policy to Unrestricted to allow the installer to execute.
Move the diagrid.exe executable into your path:
Move-Item .\diagrid.exe "$($env:USERPROFILE)\bin"
Verify the installation:
diagrid version
Set Up Diagrid Dashboard
Run the dashboard:
- MacOS
- Linux
- Windows
docker run \
  -p 8080:8080 \
  ghcr.io/diagridio/diagrid-dashboard:0.0.1
docker run \
  -p 8080:8080 \
  ghcr.io/diagridio/diagrid-dashboard:0.0.1
PowerShell:
docker run `
  -p 8080:8080 `
  public.ecr.aws/d3f9w4q8/local-dash-temp:latest
Command Prompt:
docker run ^
  -p 8080:8080 ^
  ghcr.io/diagridio/diagrid-dashboard:0.0.1
Access the dashboard at http://localhost:8080.
Clone Quickstart Code
Clone the quickstart code from the Diagrid Labs GitHub repository:
diagrid dev quickstart --type multi-agent-workflow --language python
Navigate to the quickstart directory:
cd multi-agent-workflow-python
Configure OpenAI API Key
Add your OpenAI API key to resources/openai.yaml:
metadata:
  - name: key
    value: "YOUR_OPENAI_API_KEY"
Install Dependencies
Create and activate a Python virtual environment:
python -m venv venv
source venv/bin/activate  # MacOS/Linux
# Or: venv\Scripts\activate  # Windows
Windows users: Use venv\Scripts\Activate.ps1 (PowerShell) or venv\Scripts\activate.bat (Command Prompt). Use conda, pipenv, or your preferred tool if desired.
Install requirements:
pip install -r requirements.txt
Run Locally with Dapr
Run your application with Dapr locally. Make sure your state component is in the components directory.
dapr run --app-id customer-support-system --resources-path resources --app-port 5001 --dapr-http-port 3500 -- python main.py
Your application is now running locally with Dapr. You can view workflow executions in the Diagrid Dashboard.
Interact with Multi-Agent Workflow
With the quickstart running locally, test the Multi-Agent Workflow using curl or the REST Client extension with the test.rest file.
Upon successful execution, the customer-support-workflow logs will show both agents working in sequence: the Triage Agent validating entitlement and urgency, followed by the Expert Agent analyzing the environment and generating a resolution.
Start multi-agent workflow
Open a new terminal and start a customer support workflow:
curl -i -X POST http://localhost:5001/workflow/start \
  -H "Content-Type: application/json" \
  -d '{"customer": "Alice", "issue": "My Dapr system fails to start in production."}'
This command will block until the agent completes the workflow that has been started. The workflow will:
- Run the Triage Agent to check customer entitlement using the
check_entitlementtool and assess urgency based on the issue description - If entitled, run the Expert Agent to retrieve environment details using the
get_customer_environmenttool and generate a detailed resolution - Return a customer-ready response with the proposed fix and urgency level
- Persist all execution state and agent conversation memory in the local state stores
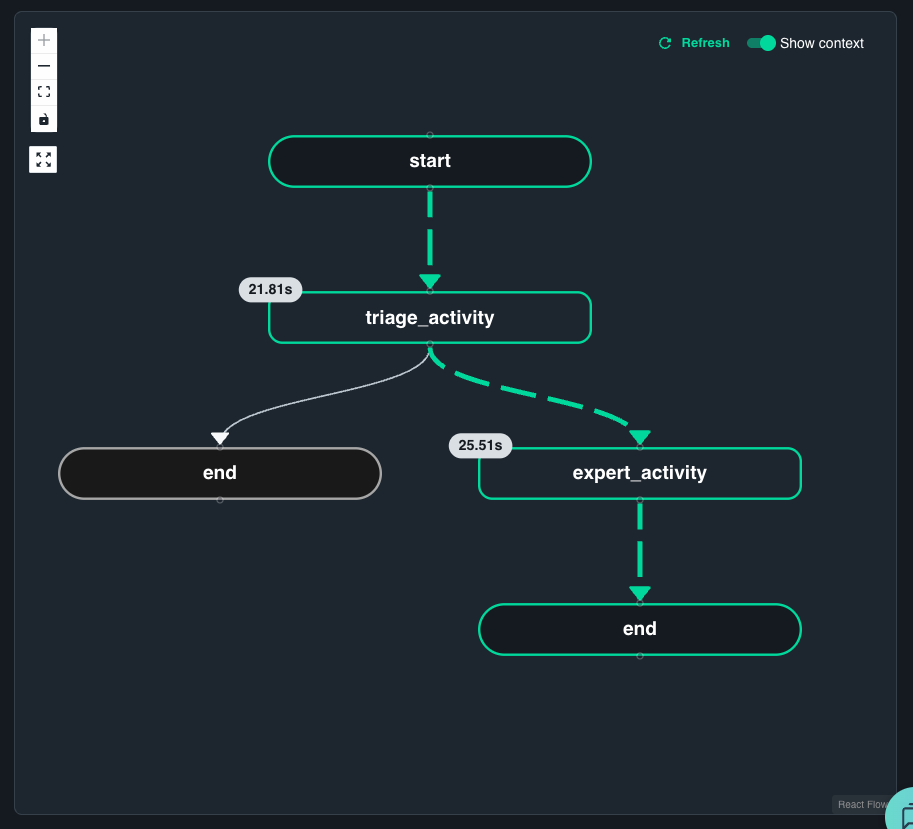
View in Dashboard
Navigate to http://localhost:8080 to see your workflow executions in the Diagrid Dashboard. You can:
- List all workflow executions for the
customer-support-systemapp - Filter and page through executions
- Drill into a single execution to see its status, metadata, and lifecycle
Test non-entitled user
Try a query with a customer who does not have an entitlement to see how the workflow handles rejection by skipping the Expert Agent step:
curl -i -X POST http://localhost:5001/workflow/start \
  -H "Content-Type: application/json" \
  -d '{"customer": "Bob", "issue": "The Kubernetes Jobs controller keeps crashing on startup, in production!"}'
Observe in the Diagrid Dashboard how execution ends after the Triage Agent reports the missing entitlement.
Part 2: Onboard to Catalyst Online
Once you've developed and tested your multi-agent workflows locally, onboard to Catalyst Online for managed workflow execution and additional features.
Log in to Catalyst Online
Authenticate to Diagrid Catalyst Online:
diagrid login
Confirm your organization and user details are correct:
diagrid whoami
Onboard to Catalyst Online
The diagrid dev run creates your Catalyst Online project (if needed), provisions resources (App IDs, Components, managed state stores for execution/memory/registry, and pubsub), configures environment variables, and sets up the connection between your local environment and Catalyst Online.
diagrid dev run -f dev-python-multi-agent-workflow.yaml --project dev-python-multi-agent-workflow
Interact with Multi-Agent Workflow (Catalyst Online)
Test the Multi-Agent Workflow API as before. Workflows are now executed by Catalyst Online:
curl -i -X POST http://localhost:5001/workflow/start \
  -H "Content-Type: application/json" \
  -d '{"customer": "Alice", "issue": "My Dapr system fails to start in production."}'
Monitor in Catalyst Dashboard
Navigate to the Catalyst web console to monitor your workflow execution.
1. View Workflow Execution
Use the Workflows section to observe real-time progress. You can examine each activity with its input, output, and timing:
2. Examine State Storage
Catalyst maintains state stores that persist workflow and agent data:
statestore- Workflow execution state and retry informationmemory-state- Conversation history and context
Inspect key/value data in the Diagrid KV Store data explorer.
3. View Application Map
The Application Map visualizes how the customer support system interacts with Catalyst-managed components and dependencies.
View detailed workflow logs using the Diagrid CLI:
diagrid workflow get $WORKFLOW_ID --app-id customer-support-system
Clean Up
Clean Up Local ResourcesOptional
Stop the Diagrid Dashboard:
docker stop $(docker ps -q --filter ancestor=diagrid-dashboard:latest)
Remove the quickstart directory if desired:
cd ..
rm -rf multi-agent-workflow-quickstart-python
Offload from Catalyst OnlineOptional
To disconnect from Catalyst Online and remove the provisioned resources:
diagrid dev stop --project dev-python-multi-agent-workflow
This command will remove the connection between your local environment and Catalyst Online.
The diagrid dev stop command does not delete the Catalyst Online project and contained resources. To delete the entire project, use diagrid project delete <project-name>.