Conductor Quickstart
Get up and running with Conductor in under 10 minutes. This guide walks you through creating a cluster connection, installing the Conductor agent, and deploying your first Dapr application.
What you'll need
See the complete Prerequisites list for detailed requirements based on cluster type.
Quick checklist:
- Kubernetes cluster (1.21+) with kubectl access
- Conductor account - Sign up free
- Internet access - Outbound access to these addresses
- Optional: Docker (for local cluster), Dapr (can be installed by Conductor)
Getting Started
Create a Local ClusterOptional
Skip this if you already have a Kubernetes cluster.
- Kind
- Minikube
Install Kind:
brew install kind  # macOS
# or download from https://kind.sigs.k8s.io/docs/user/quick-start
Create cluster:
After installation, create a Kubernetes cluster including a control plane and two worker nodes, with exposed container ports to the host machine:
kind create cluster --name conductor-quickstart --config=
<(echo "
kind: Cluster
apiVersion: kind.x-k8s.io/v1alpha4
nodes:
- role: control-plane
kubeadmConfigPatches:
- |
kind: InitConfiguration
nodeRegistration:
kubeletExtraArgs:
node-labels: "ingress-ready=true"
extraPortMappings:
- containerPort: 80
hostPort: 8081
protocol: TCP
- containerPort: 443
hostPort: 8443
protocol: TCP
- role: worker
- role: worker
")
Verify cluster:
kind get clusters
Install Minikube:
brew install minikube  # macOS
# or see https://minikube.sigs.k8s.io/docs/start/
Start cluster:
minikube start
Verify cluster:
minikube status
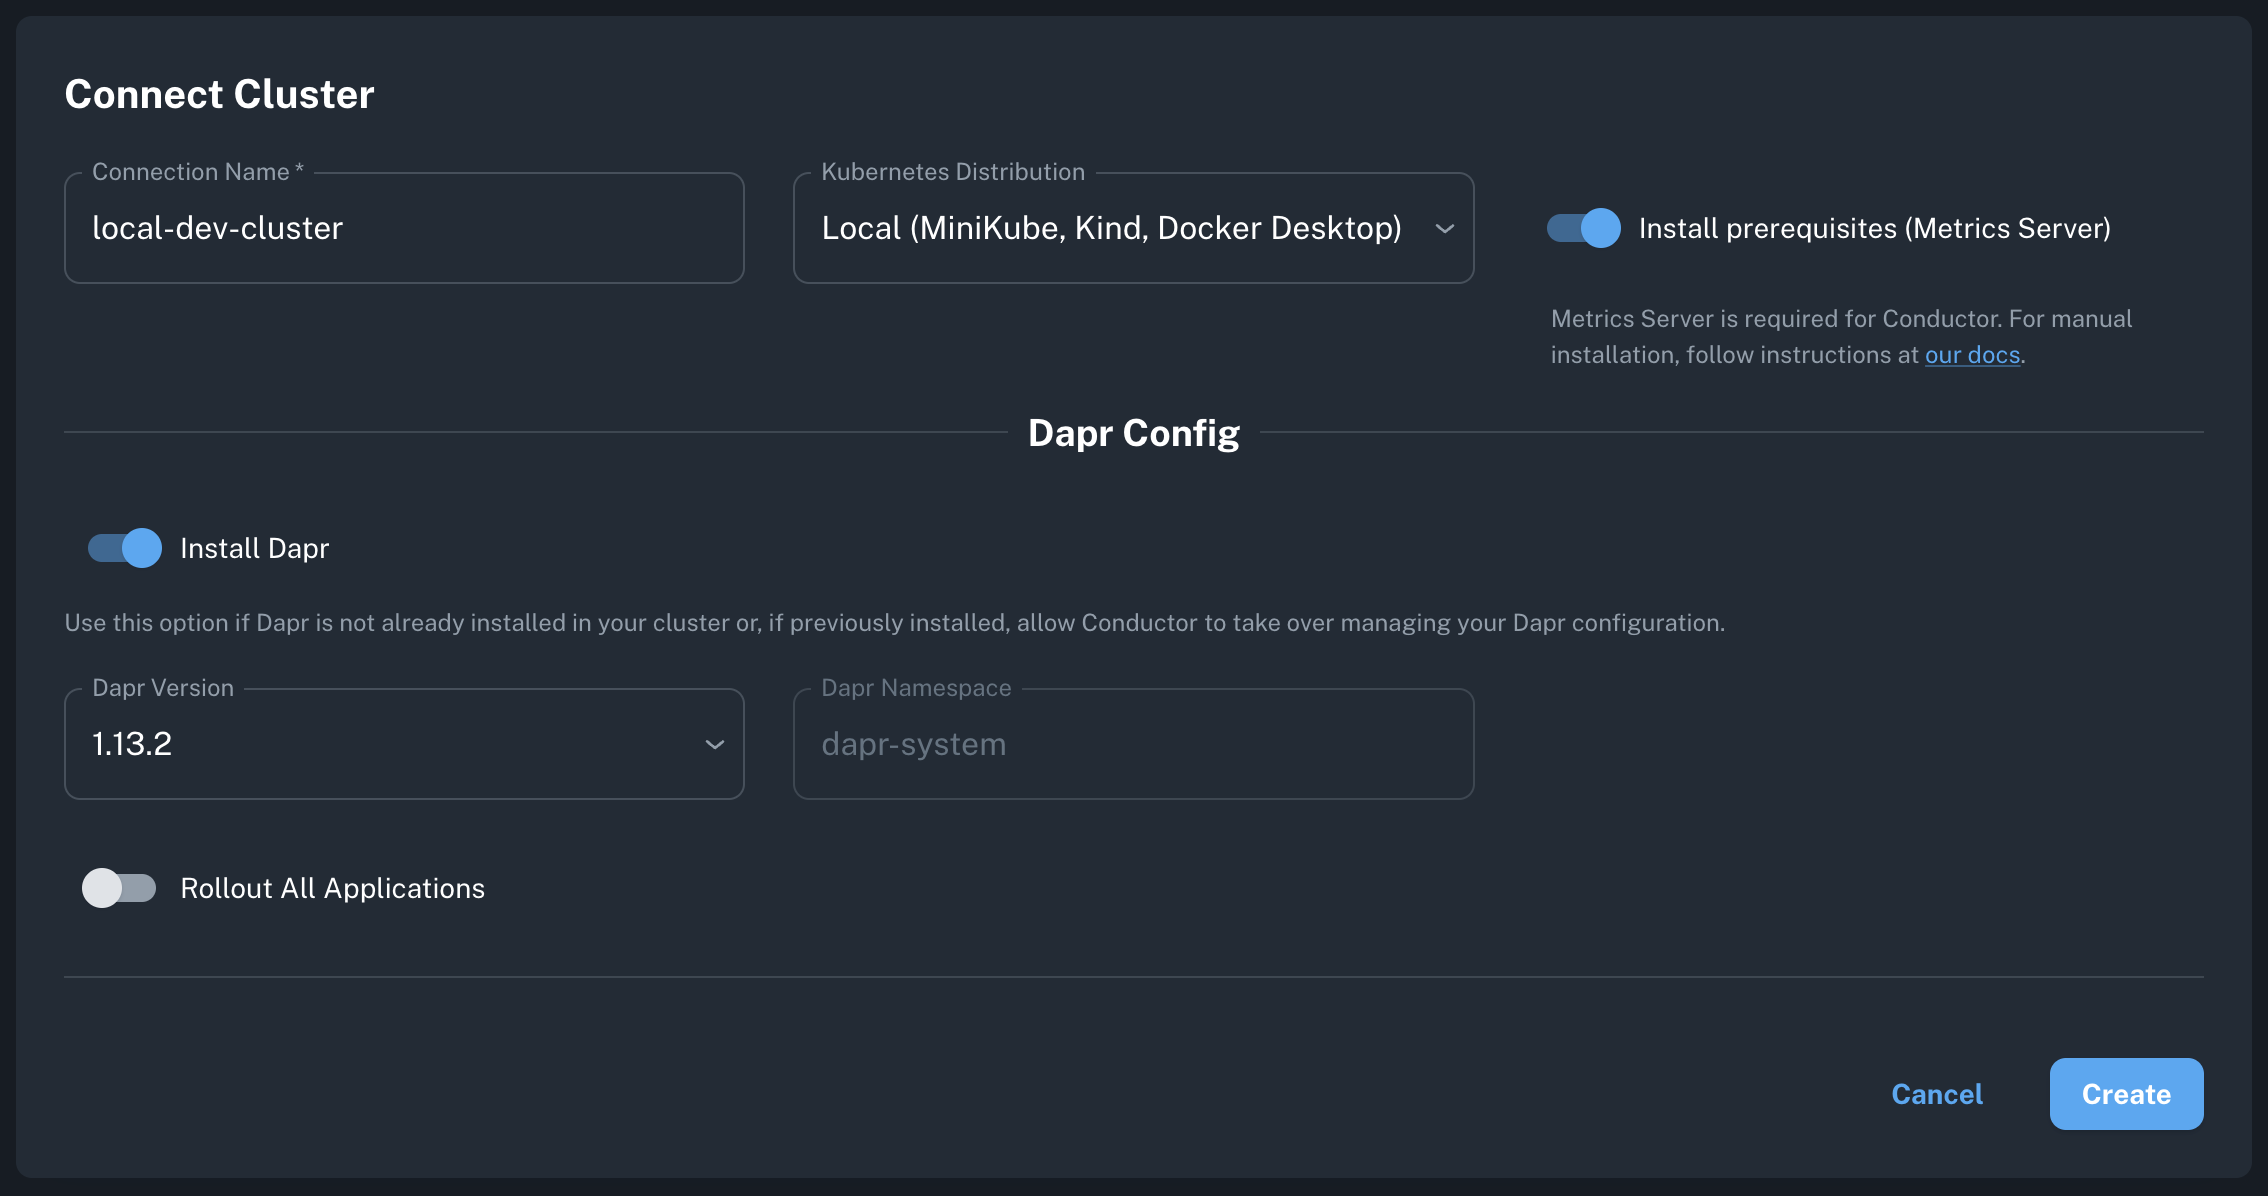
Create Cluster Connection
-
Log in to the Conductor console.
-
Create Connection:
- Click "Connect Cluster" or "Create Cluster Connection"
- Name your cluster (e.g.,
my-dev-cluster) - Select your Kubernetes distribution
-
Configure Options:
- Local/Dev
- Managed (EKS/AKS/GKE)
- On-Prem/Enterprise
- ✅ Install prerequisites (metrics server)
- ✅ Install Dapr (latest version)
- Cluster type: Local (Minikube, Kind, Docker Desktop)
- ⬜ Install prerequisites (usually already installed)
- ✅ Install Dapr (or install separately)
- Cluster type: Select your provider
- Network: Ensure outbound port 443 is open
- ✅ Install prerequisites (if needed)
- ✅ Install Dapr
- Cluster type: Other
- See Helm installation for advanced options
- Click "Create" - Conductor generates your installation command and Kubernetes manifests.

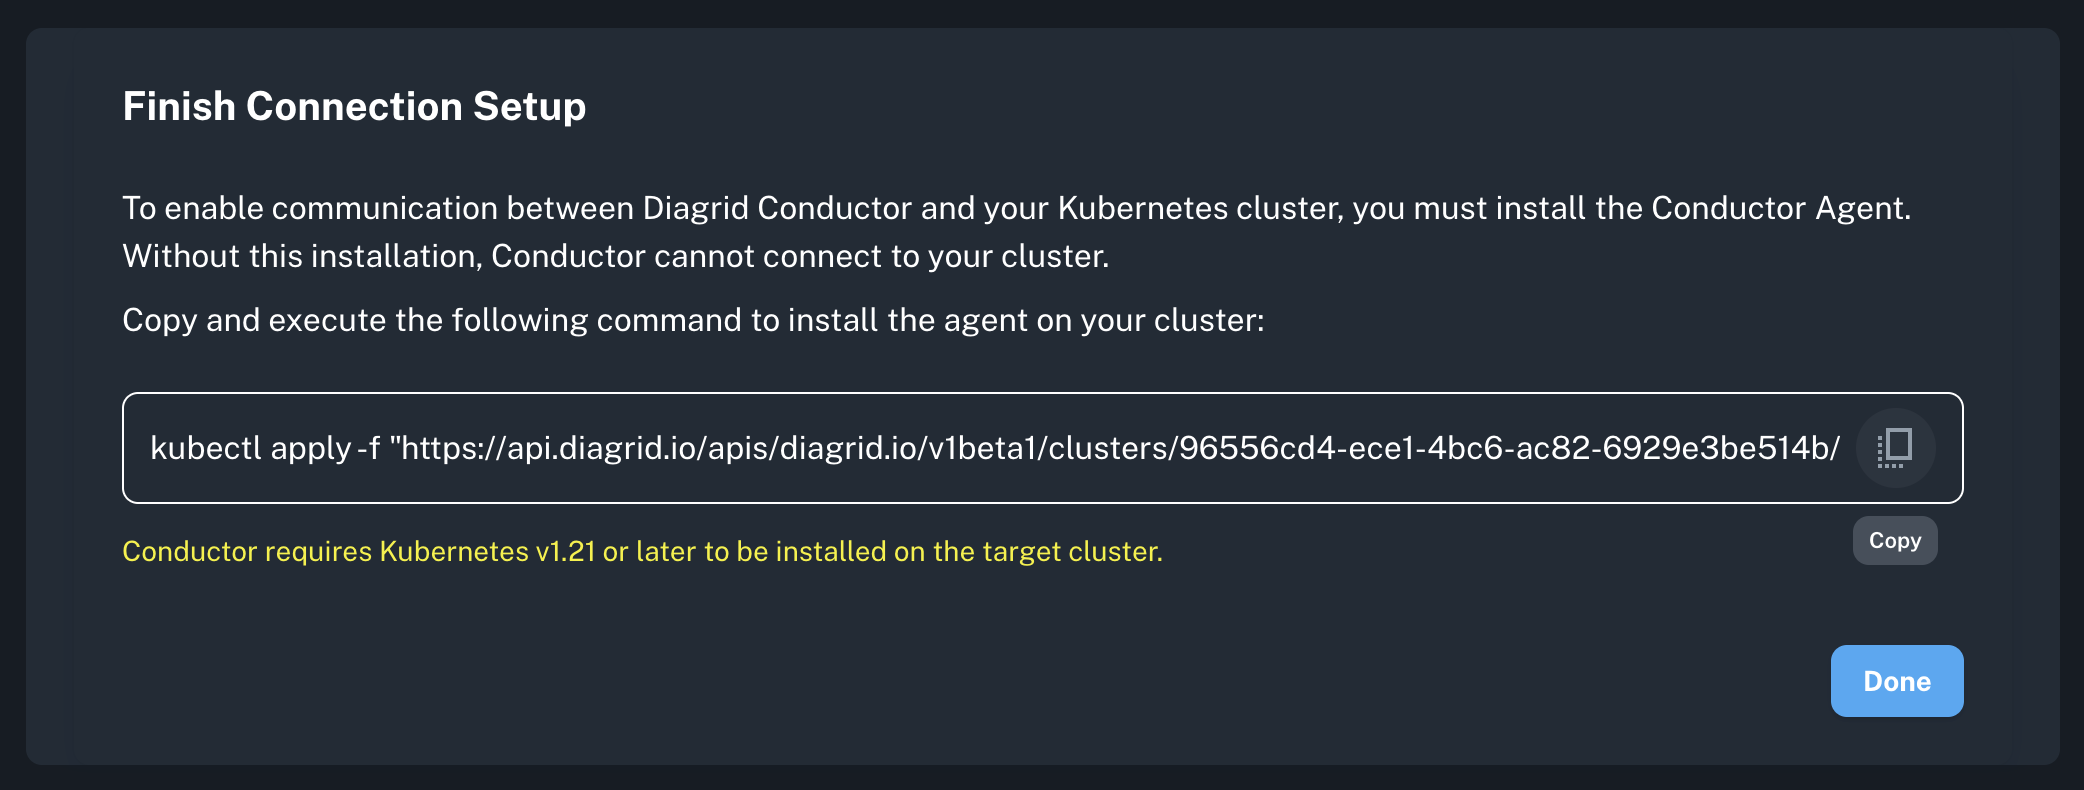
Install Conductor Agent
Copy the generated command from the console and run it:

kubectl apply -f "https://api.diagrid.io/v1/...YOUR_TOKEN..."
What gets installed:
diagrid-agent(Deployment) - Manages Dapr control planediagrid-agent-logs-collector(DaemonSet) - Collects sidecar logsdiagrid-agent-otel(StatefulSet) - Collects Dapr metrics
Verify installation:
# Check agent status
kubectl get pods -n diagrid-cloud

# Expected output:
# NAME                                     READY   STATUS    RESTARTS   AGE
# diagrid-agent-xxxxx                      1/1     Running   0          30s
# diagrid-agent-logs-collector-xxxxx       1/1     Running   0          30s
# diagrid-agent-otel-0                     1/1     Running   0          30s
In Conductor console:
- Agent status changes from
Offline→Online(takes a few seconds) - Dapr control plane shows
Healthy
If agent stays offline > 2 minutes, check:
- Agent logs:
kubectl logs -n diagrid-cloud -l app=diagrid-agent - Cluster has outbound HTTPS access to all the addresses here.
- The Kubernetes metrics server is installed.
Run a Sample Dapr Application
Deploy a sample application from the conductor-quickstart repository. This includes a Python app that generates messages and a Node app that saves them to Redis.
Install Dapr and Redis
- Helm (if Dapr installed via Conductor)
- Dapr CLI (if Dapr not installed)
helm repo add bitnami https://charts.bitnami.com/bitnami
helm repo update
helm install redis bitnami/redis --set cluster.enabled=false --set replica.replicaCount=0 --set fullnameOverride=dapr-dev-redis
dapr init -k --dev
Installs Dapr, Redis, and Zipkin.
Deploy the sample application
- From remote
- From local
kubectl apply -f https://raw.githubusercontent.com/diagrid-labs/conductor-quickstart/main/deploy.yaml
git clone git@github.com:diagrid-labs/conductor-quickstart.git
cd conductor-quickstart
kubectl apply -f deploy.yaml
Monitor in Conductor console
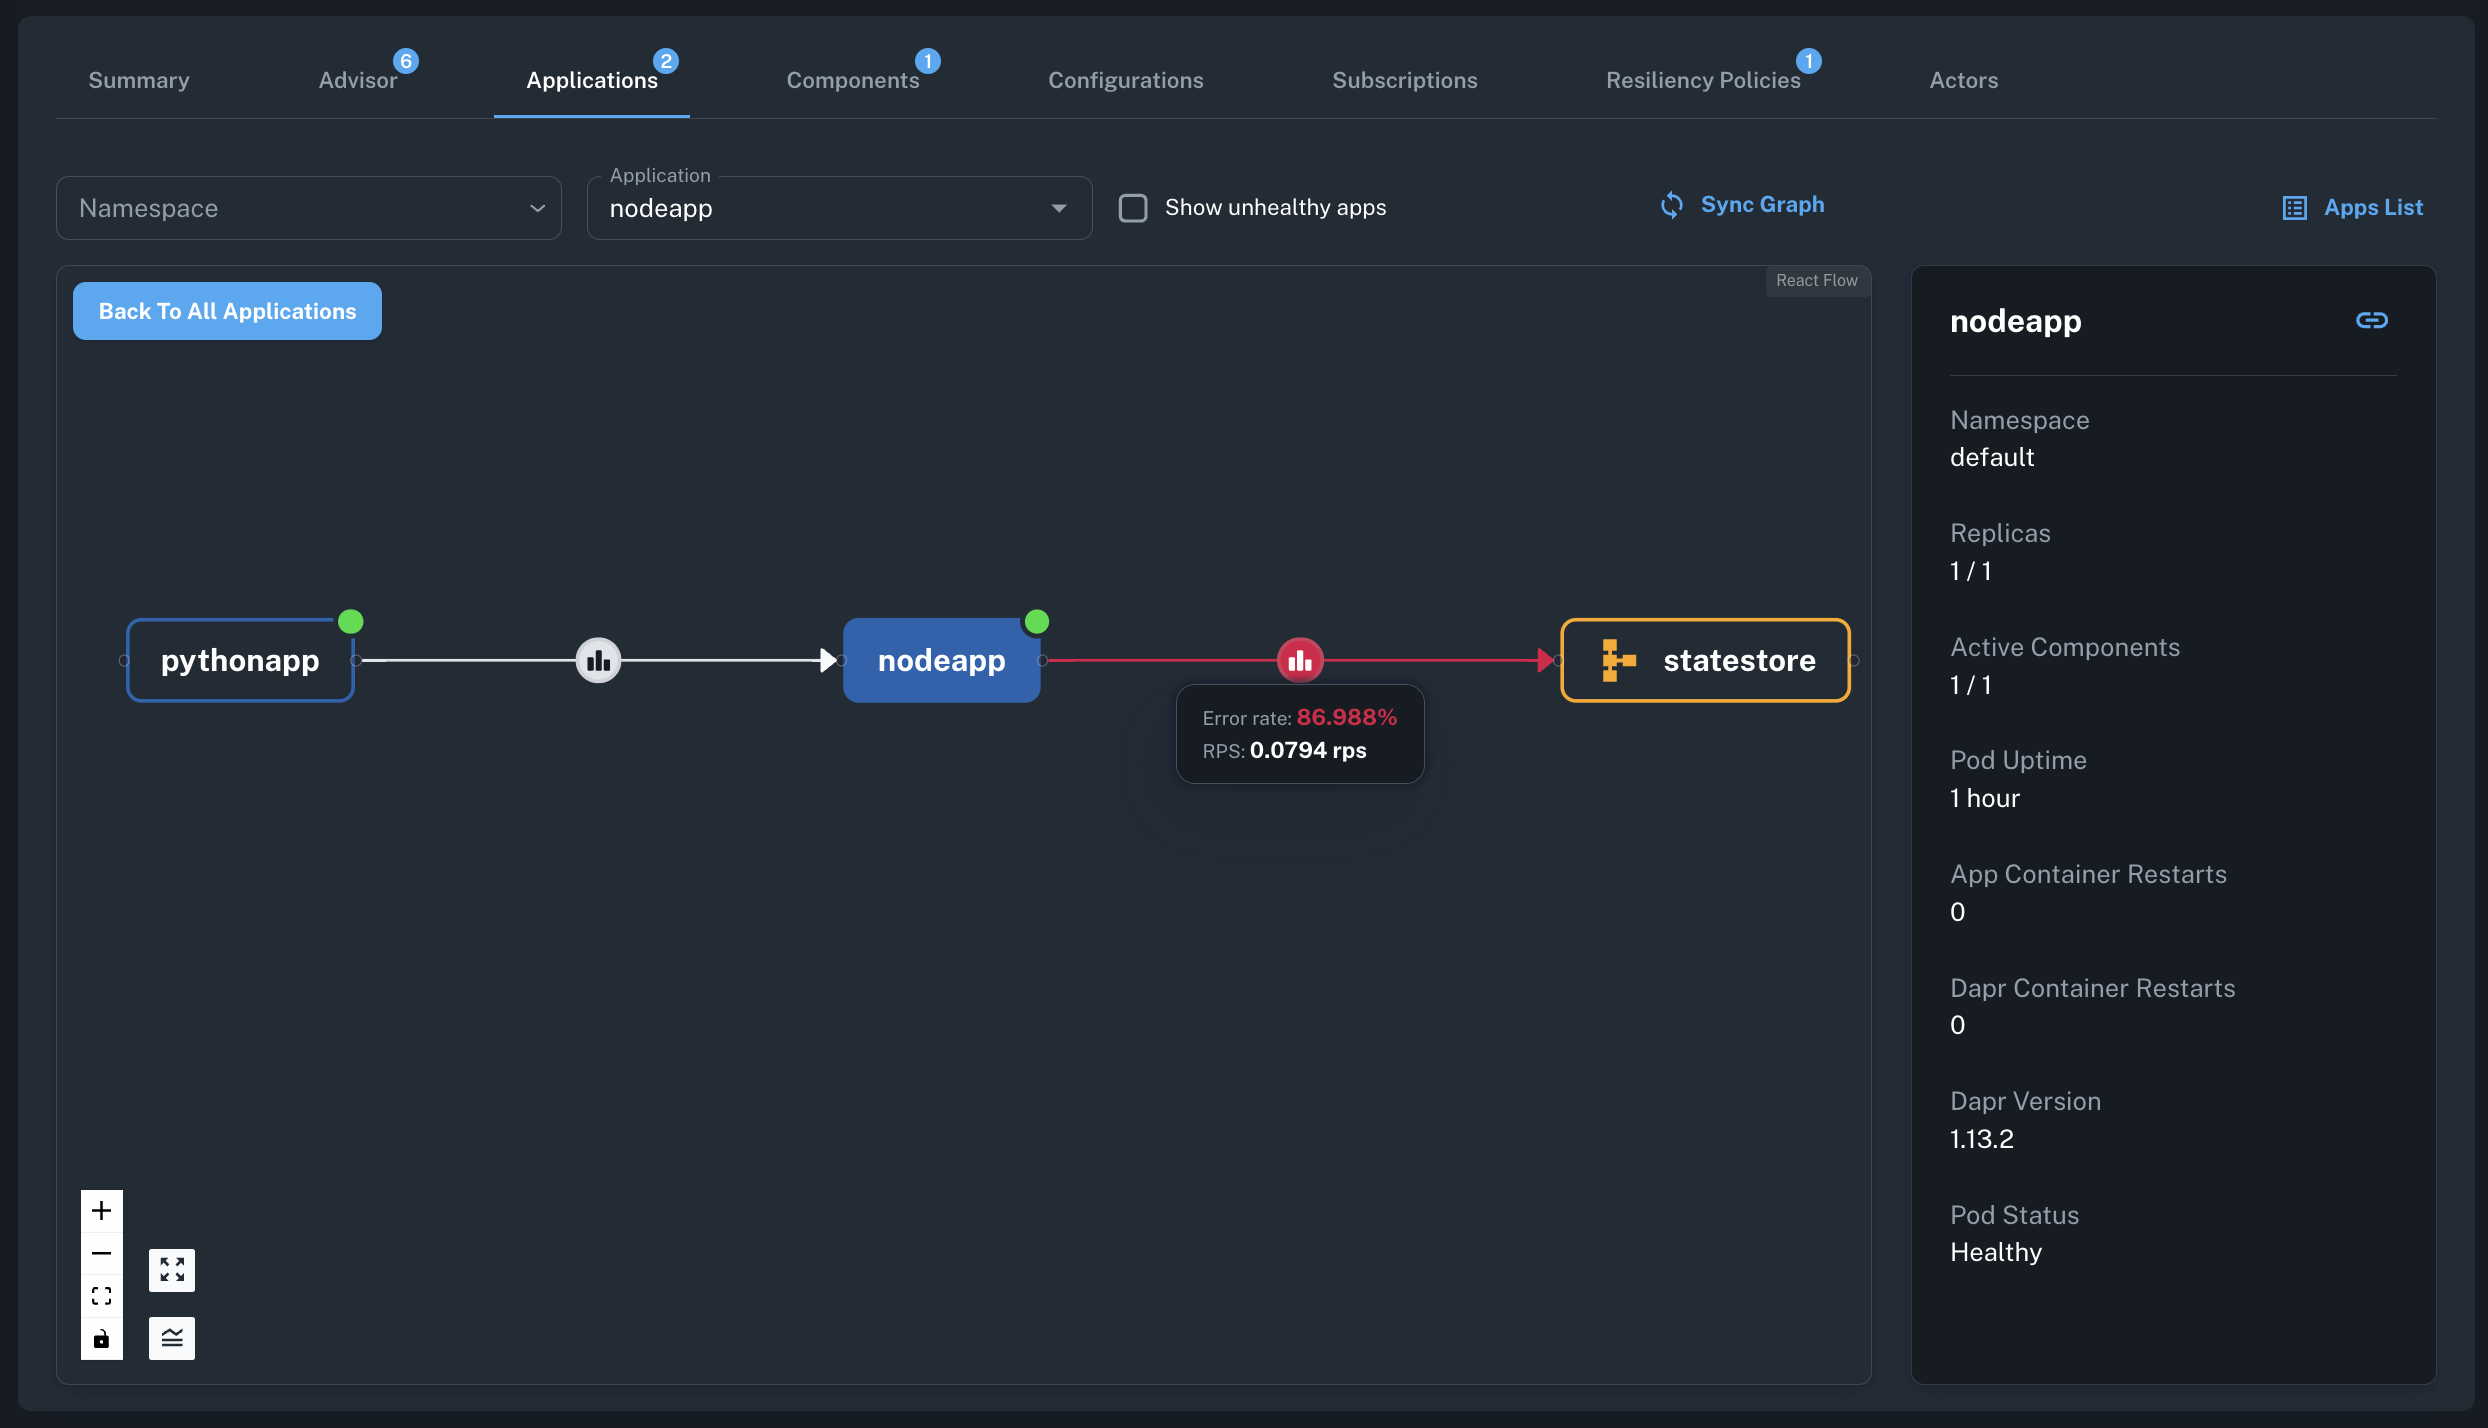
Navigate to Applications tab to view:
pythonappandnodeappdeployments- Component initialization status
- Apps Graph for network topology
Troubleshoot a failureOptional
To simulate an infrastructure failure, scale down the Redis instances to zero.
kubectl scale statefulset dapr-dev-redis-master --replicas=0
In Conductor, observe the failure through various indicators:
- The Component List will display the
statestorecomponent'sInitialization StatusasErrorafter scaling down. - The
nodeappapplication's component metrics graphs will show an increase in error rates. - The resiliency policy will activate and the retry rates will start increasing.
- After a few minutes, there will be issues detected based on
App Component Error RateandHTTP Error Ratemetrics. - The
Apps Graphwill highlight the erroneous component and its impact on the dependent applications.

To restore the application, scale the Redis instance back up to one.
kubectl scale statefulset dapr-dev-redis-master --replicas=1